
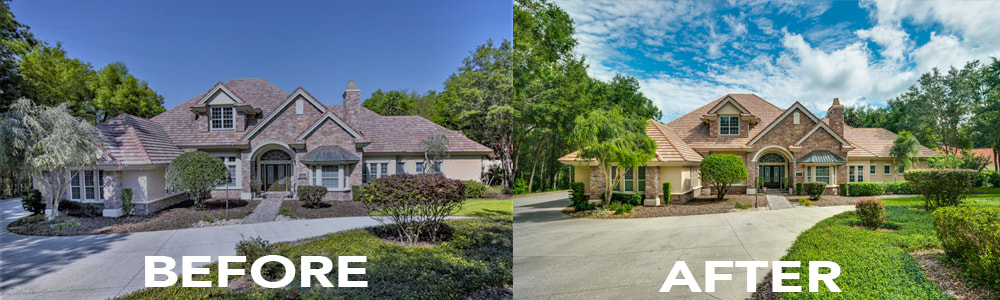
 Being a real estate photographer requires a lot of skills. Your task does not only stop when you have finally captured a good image. It is just a part of a photographer's task. After taking up the necessary shots needed, the next thing that you should do is to make use of your post-processing skills. This means that you need to know the basics when it comes to editing images. As a photographer, editing is also an essential key to having a great photography. And to help you know the basics, listed below are some of the common adjustments that you need to apply to a certain image. 1. You should fix the distortions present on the imageIn correcting the distortions present in an image using the Lightroom, there are two processes involved: • Automatic Correction - Open the image that you want to edit on the Lightroom app. - Proceed to the "Develop Module" - Look for the panel of "Lens Correction." You should also make sure that you are on the right tab which is the basic tab. - Click the text which says "Enable Profile Corrections." - Try to choose among the options given which includes: Auto/ Full/ Level/ Off/ Vertical. • Manual Correction - Proceed to the same panel of "Lens Correction" but your tab needs to be switched from basic to manually tab. - Choose among the sliders that will be presented to you. 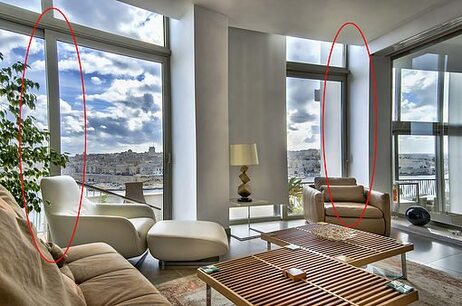 2. You should also correct the verticals on the imageIn correcting the verticals of an image; the best editing app to use is Photoshop. The process involved is as follows: - Open the photoshop and look for the image that you want to edit and open it too. - Before starting, you should create first a new layer by clicking Ctrl + J. - Proceed to the "Layer" panel and select the new layer that you have made. - From the menu, click on "Edit | Transform | Perspective. - Choose only one from the transform handles. Afterwards, click and drag the image outwards. 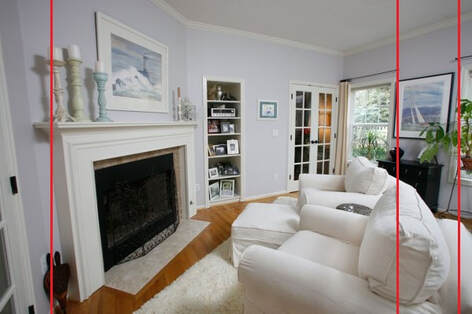 3. You should adjust the lightsIf you think that an image is too dark or too bright, you can adjust the lightings on a certain editing app. In Lightroom CC, this is the process for adjusting the brightness of an image: • Go to the "Light" panel and use the controls presented there. - Select the photo and click "Edit." - Click "Auto." - Use the sliders present in the Light panel which includes: Exposure/ Contrast/Highlights/ Shadows/Whites/ Blacks. • Using the "White Balance," correct the color cast. - If the color looks unpleasant, go to the "Color" panel for shifting the color of the entire photo. - From the "White Balance's" drop-down, choose a preset. - Drag the slider of "Temp" or "Tint" for manually adjusting the color of the photo. • Adjust the saturation of the photo by using the slider of "Vibrance and Saturation." - Drag the saturation slider to adjust the color intensity of a photo. Drag right to increase or drag left to decrease its color intensity. - To add more saturation, drag the "Vibrance" slider to the right or to the left for decreasing its saturation.  The processes mentioned above in editing a photo are just some of the few editing adjustments to find in a certain app. As a professional photographer, you should dig deeper on that because real estate photo editing is also one of the main tasks being done by a pro.
0 Comments
Leave a Reply. |
A. RookeReal estate photographer for 10 years. Archives
August 2020
Categories |
 RSS Feed
